• ODT Gun Show & Swap Meet - May 4, 2024! - Click here for info

tripwir3

Default rank <200 posts
Tracker
14   0
Joined
Jan 11, 2016
Messages
167
Reaction score
594
Location
Atlanta GA
Whats good ODT?
I've been told my re-build / restoration / resurrection might deserve its own thread so people can actually find the info... so here we go!

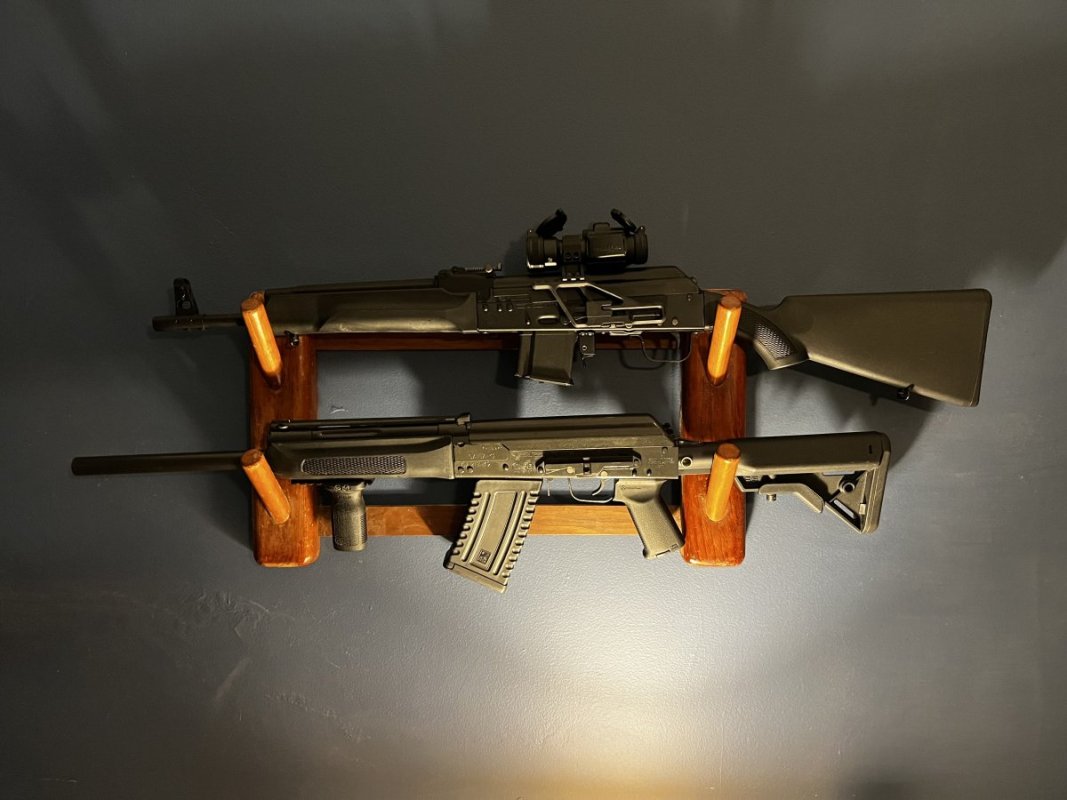
This is a 386 Factory Milled MAK-90 from 1993 (93 date code) that came to me as a "needs serious help" sale on ODT in January ($600 - maybe I over-paid but I have no remorse this project has been TONS of FUN!!!!).
I had never owned a Chicom AK before it, and have since purchased 4 including this bad larry - the AK addiction is REAL.
My other AK prior to it is a mint condition SAR-1 that I picked up off my best friend's Dad in 2014 for $400 with 2K rounds of sealed WOLF Poly.... she's been significantly improved since then too but that's an entirely different story!

I'll start with post-acquisition Wirebrushing - clearly, I gave up before I got to the receiver and moved on to sandblasting
img_1990-jpg.2126568

Gorgeous rust and pitting throughout the BCG
img_1991-jpg.2126569

I'm still not sure why I didn't just throw this dust cover in the trash - all the reprofiling to get out the pitting has loosened the fitment on the receiver so it still might get trashed....

Any tips to tighten it up would be appreciated - I have a few ideas but they all include bending the front notch to try and tighten its seating within the RSB channel...

img_1999-jpg.2126570

I literally think this MAK-90 previously took residence in a swamp, how TF do you let this happen?!
You would have thought the barrel would suffer too right? Nope, the chrome lining is immaculate and the rifling is just as crisp as my "Unfired" Stamped MAK-90... go figure :confused:

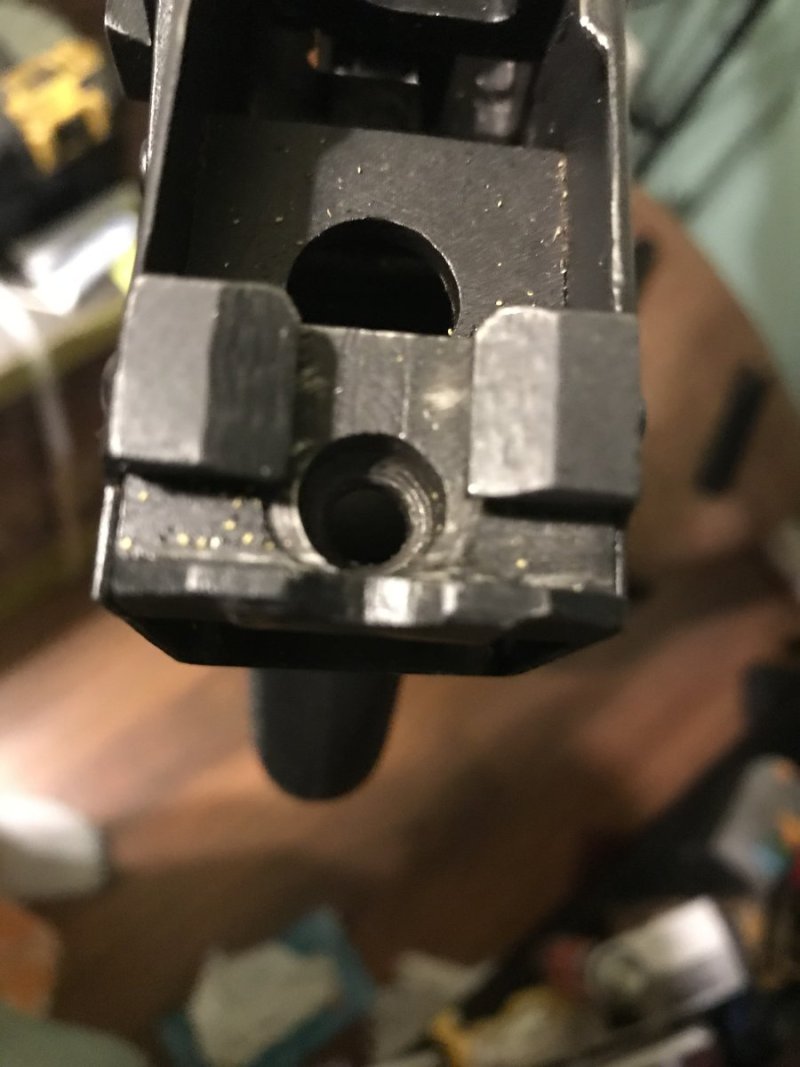
I will say that the sight cylinder in the FSB is totally seized though, and I basically gave up trying to move it until I meet someone with a press that I can feed beer too in order to use it to break it free
img_2001-jpg.2126571

For some reason, this is the only photo I took of the receiver before I sandblasted it like 5 different times, I think the previous owner who is a member here on ODT went at it with a $3 rattle can from harbor freight... it stank up my house to the point where I had to put it outside on my deck. He said that he bought it off yet another ODT member that didn't disclose the fact that it had significant rust/pitting... the middle man started a thread in this sub-forum asking about sandblasting saying he couldn't get the finish off so I wonder if he hit it with more paint to cover up his attempt at stripping it?? Regardless, it smelled fresh and entirely uncured.
img_2002-jpg.2126572
 
Alright, now that we have been through the wire-brushing and all the wonderful pitting and rust, it's time to take an adventure into sandblasting!

So to preface this - I'm incredibly mechanically inclined. While my day Job is finishing up a PhD at Emory in Transplantation Immunology, I also wear steel-toed boots and smell like grease and oil most nights. I have experience sandblasting in a commercial environment (aerospace machining) I had never attempted gravity fed sandblasting outside of a cabinet - needless to say, I'm not much of a fan :bull_head:

This was my ghetto blasting rig..... complete with a high-tech lighting system
The biggest problem with this whole process was that I couldn't ever see anything as the oxide would get into my goggles that would also fog up and then there was just a constant cloud of dust - I probably should have gone a step up from an N95 mask but oh well.
I used the red-hopper Harbor Freight gravity blaster - thing's a POS in terms of wasting oxide and not being able to control the feed rate but I assume any gun will suck compared to a pressure fed tank...
img_2008-jpg.2126599

The pitting and rust just keep coming out to play!
img_2004-jpg.2126600

- I think I went through about 4 solid sandblasting sessions each about 2 hours, I did a baseline blast then, did a second blast to hit the parts a missed the next day.
- I then took everything to the Dremel - sanding drums, milling bits wire wheels the whole kitchen sink
-Sandblasted it all again, more aggressively to try and smooth things out - the Dremel likes to create new problems while trying to solve others so it's always a win-lose
img_2005-jpg.2126601

At this point, I realized that while I had removed all the major areas of pitting, I had also created all sorts of "topography" if you will... no good if I'm trying to return this to factory condition!

So I went online and read a few articles from the '90s about re-building and re-finishing mil-surplus, and found out about a technique called draw filing! I knew about the act of using a farriers rasp to reprofile metal surfaces, but I didn't realize it had a name and could be done lightly on firearms. Basically just running a fine tooth cross-cut file back and forth perfectly parallel to the surface of interest - I'm sure this is old news to most of you though!
It started to look 1000x better after just 5 minutes!
img_2053-jpg.2126602

The safety stop rivet was a PITA but I worked around it
img_2054-jpg.2126603

- After I finished re-profiling the surfaces of the receiver, I went over everything with an air powered die grinder wire brush (no more ***** Dremel nonsense)
- Obviously, everything went back for a final round of sandblasting to get nice surface continuity. Probably overkill, but anything worth doing is worth overdoing, moderation is for cowards.
 
At this point, it's time to start wrapping it up and moving on to the "finishing" steps
While I have never personally done auto-paint, I have a deep understanding of what goes into the surface prep for quality finishes! Its ALL in the prep!!!

So from the final sandblasting, we moved on to more manually intensive labor - HAND SANDING!
- Obviously, I needed my dog's help throughout this re-build he was the acting foreman, but only managed to slip into one picture!
- Hand sanding started at 150 Grit - I hit EVERY surface I could possibly reach quite exhaustively
- Moved on to 220 Grit - EVERY surface
- Finished with 400 Grit - EVERY surface
I failed to take hand sanding progress pictures, but it wasn't nearly as transformative as some of the other steps... so I'm not upset about it.

Now its time to POLISH!
I used my tried and true Mothers Aluma-Mag polishing compound on a cloth polishing wheel
img_2121-jpg.2126639

I probably spent about 3 days polishing every reachable surface on parts, gotta have the wire-drive Dremel handle for this otherwise its a lost cause as you can only really hit outside surfaces
It came out pretty sexy, I was decently proud for my first try at polishing an entire AK
I know the springs are not yet polished in these photos but I did them right before I did my coating.
img_2132-jpg.2126640

I got all the important parts to look nice - I didn't really feel like making the trigger guard exquisite, but once the finish was on it you can barely tell its not perfect.
img_2133-jpg.2126641

Everything was then wiped down with a moist shammy cloth, minor sanding and re-polishing, of course, ensued (see the not so perfect lever on the Lower HG retaining cap - yes I fixed it)
img_2134-jpg.2126642

Time for the Finish Application!
I wanted this rifle to be as close to the way it looked coming out of the factory as it possibly could. However, I don't have the room for a hot blue set-up while I still live in ATL, so I went with the next best thing - Black Oxide
- I put all the parts through a degreasing wash and then dripped everything in acetone to get the cleanest possible surface.
- I then put all my parts on clean baking trays and threw them in the oven at about 280F for 30 minutes to fully heat-soak
- Submerged the hot parts in my black oxide solution for about 5 minutes (When you Dilute the Black Oxide Concentrate, USE distilled and deionized water ONLY!)
- Washed all parts immediately with tap water to remove the acid solution
- Very gently blotted them dry with lap sponges (Surgical sponges that don't leave fibers behind)
- Submerged and coated everything for about 20 minutes in penetrating sealer
- Allowed parts to air dry overnight, applied a second coat of penetrating sealer and let them dry through the day
img_2136-jpg.2126643

- After work, I wiped down with lap sponges, coated the parts in a more viscous protective/lubricating oil (Rem Oil) and gently went over all surfaces with 00000 steel wool just to remove any smudging or smutting if areas had slight blemishes which were extremely minor
- Reassemble the MAK-90 and compare it to my unfired mint condition stamped MAK-90
img_2139-jpg.2126644

- The rifle didn't come with a T-nut for the grip (I have one on order - and I think I'm going to use a Magpul grip because I hate the wooden grip and bakelite grip ergonomics) and had some hideous choate or fiber-force sporter stock and HG's on it when I bought it. I picked up some NOS Polytech/Norinco HG's off the AKFiles with ferrules and retainer clamps for only $50 shipped
- Now I need to either find an ironwood type 56 contour stock or just bite the bullet and order one to stain myself. As far as my research has led me this is by far the best option for these rifles.
IMG_2195.jpg

- I hope you enjoyed this little reconditioning project! I'm already on the hunt for a new rifle to refinish!
-I will post final assembly pictures in the 4th post of this thread as soon as I get the stock in and get some much better close-ups of the Black Oxide Finish Vs. Factory Blue on my "NIB" Stamped MAK-90!

Feel free to ask questions and make comments! I know I'm not perfect, but I'm always willing to learn something new!
 
Hi Tripwir3,

Many years ago now, I bought a brand new Polytech AK47 milled receiver. Best shooting AK I ever shot. If you can find it, the correct wood (if you don't want the gawd awful ugly thumbhole stock) is a Chiu wood (chinese hardwood, more or less - your handguards on both the rifles you pictured are made of chiu wood) sprayed with a darker red shellac. Handguards same color. Very close in color to the handguards you have on there now, but a bit more red.

Norinco milled AK's were hard (read that unavailable) at the time I got my Polytech, though they did offer a stamped version and a very fine SKS (very accurate). If you receiver is a Norinco, they were generally finished either in a medium brown like the handguards you have or in the more yellow shellac that's on the Mak 90 you have. I hope this information is helpful in your restoration efforts.

Also, the original milled AK's would accept a cleaning rod and had a cleaning kit in the buttstock. I'm guessing the handguards you have will accept a cleaning rod, so all you would need is a front sight base with a cleaning rod hole and a bayonette lug. Last I knew, those were available. Based on my experience with mine and the joy I experienced with it, I would not hesitate to purchase those items and restore that milled AK to it's original glory.

I hope this information is helpful in your restoration efforts and I apologize if I'm providing information you already know.

Here's a pistol grip that is correct if you don't have one:

https://2ndamendmentak47andskspart.com/products/genuine-poly-tech-ak47-wood-grip-dark
 
Beautiful job. I just finished resurrecting an AKS a couple of days ago. The outside had some rust, but the bolt and internals were still good. I too had a cheap sand blast setup; got more on me than the parts. I decided to go with Duracoat and an airbrush. I’m not 100% pleased with the outcome, my fault not the product, but it is a shooter, not a wall piece.
 
I have one of these Mak-90 bought it dirt cheap at a Pawnshop, still had factory grease in it, light as Hell, and a Great shooter. I like the Thumb Stock.

If you look at the Milled MAK-90 in the last photo, I actually spent quite some time re-contouring the thumbhole stock to make the grip part a great deal thinner and remove any wrist or thumb interference when wrapping your hand around it - I actually really like the stock now. One of those two MAK90's will end up getting debanned back pistol grip configuration I'm just not sure which one and I've bought another 2 of them since as well hahaha
 
Back
Top Bottom