• ODT Gun Show & Swap Meet - May 4, 2024! - Click here for info

AR pistol with DRD Tactical quick assembly system

cmshoot

Marines Icon
Moderator
Staff member
Moderator
197   0
Joined
Jul 6, 2010
Messages
21,273
Reaction score
36,977
Location
Dallas GA
I’ve got spare parts, odds n’ ends lying around the shop. I decided to, over time, assemble an 11.5” AR pistol using the DRD Tactical quick assembly system.

Here are the key parts of the system, all of which I already have:

Quick change barrel nut. Designed to go on and off by hand. It’s suggested that for greatest accuracy, or high volumes of fire, that you tighten the nut with a castle nut wrench; there is no torque spec, just give it a good tug and you’re done. I’ve used this nut before, tightened only by hand, and hit 2/3 IPSC silhouettes at 500 yards with an RDS and ball ammo, so it works more than good enough for the project at hand.
12621727-6058-4682-8A04-E4D34EA95358.jpeg


The tab on the back of the DRD rail goes into a slot on the front of the DRD upper receiver, as an anti-rotation device. I’ll be using an SOLGW upper, so I’ll be milling a corresponding slot in my upper this week.

Here’s the DRD tab and slot setup:
D6A1ACA4-6AF0-4F30-AA97-F7EBF7B42123.jpeg


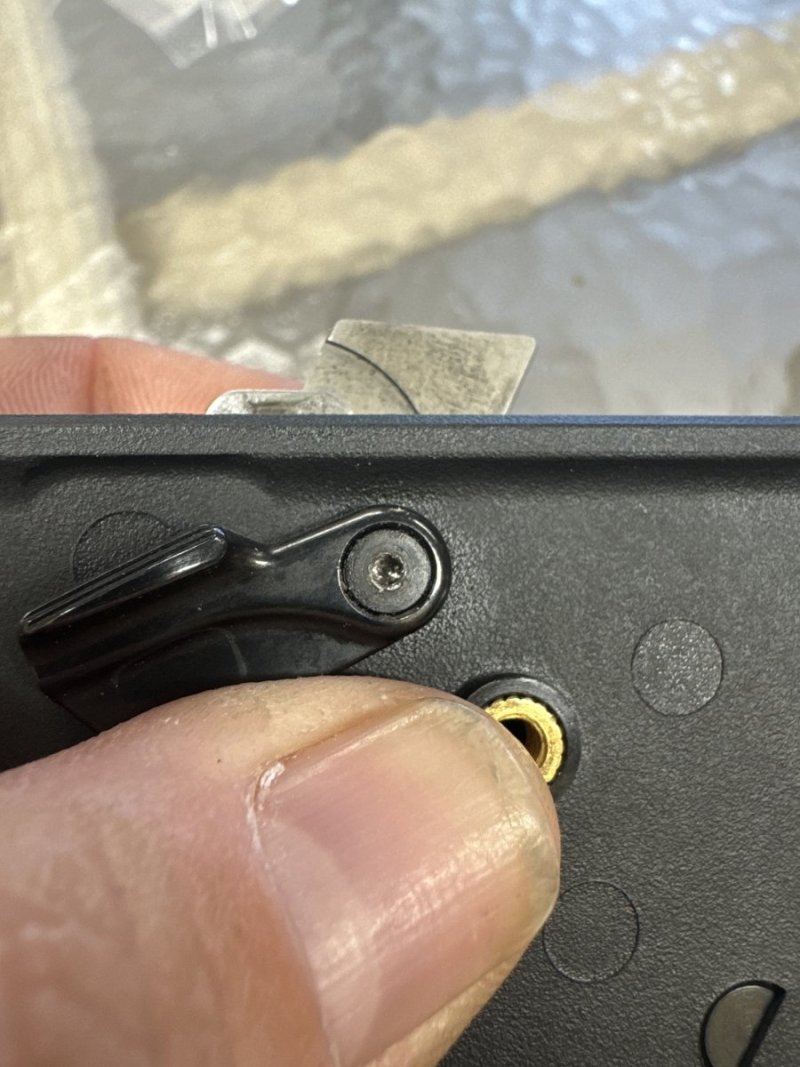
After you hand tighten the barrel nut, you slide the DRD rail on, and push the captured, hardened steel pin in. This pin corresponds with the groove towards the front of the barrel nut. Then you close the pivoting latch, which helps ensure the pin stays closed.

The pin and latch closed:
394833A6-6F84-43E5-B2FF-86D18F54D2E7.jpeg


The pin and latch when open:
8D0EABF7-9F2B-48D3-A6D4-74221DB34348.jpeg
 
SOLGW upper before milling the anti-rotation notch:
9AA637A2-7D94-431D-916D-95949660EAD9.jpeg


The DRD rail I have on hand is longer than I need, at 12.5”. I cut approximately 2.25” off the end, leaving me with an unfinished length of approximately 10.25”.

I did this with a hacksaw and I usually clean it up and square it off by hand with files, but I have some mill work to do on this rail anyways, so I’ll finish it off in the mill.

I’ll be removing material to lighten the rail. At a minimum I’ll be milling out all the recessed spots at 3, 6, and 9 o’clock. I’ll mill off the Picatinny rail sections I won’t be using; all the raised sections from the back of the rail up until about 7 slots shy of the front end. This will leave me enough real estate for a light and the front BUIS.

I’ll also be shortening and narrowing the latch to only as much as I need.

Already, by cutting off 2.25”, I have dropped the weight from 14.4oz to 12oz:
2124C10B-0BE4-4624-870D-D2AD5F4FFAD3.jpeg
 
Milled the recess for the anti-rotation tab to fit into. Neat little machining job; had to get my buddy to help me with the set up as I haven’t used the rotary table before. It was handy for those sexy curves on the front of the recess.
9CD15F6B-CF91-45A8-A3DA-3DA7D493002E.jpeg
5F664F7D-1365-4C31-AC45-12B4B78DA6F9.jpeg

After hitting it with some Birchwood Casey Aluma Black.
2C886C57-0DEB-497E-BBF3-86AFE575F6B7.jpeg

Perfect fit!
93098F14-44A3-44D3-891E-03A32FEF44C9.jpeg
 
11.5” Sionics barrel came in today, which was the only part I was missing. Everything else was spare parts that I had on hand........not always what I would prefer to use, but what I had around.

11.5” Sionics barrel, reduced gas port, CHF, CL, with gas block and tube
SOLGW upper receiver
Warrior Industries lower receiver
Wilson Combat single-stage trigger
Unknown NiB BCG (will be getting changed out)
DRD Tactical quick disassembly forearm system
Vltor A5 pistol receiver extension with A5H3 buffer
KAK brace
Magpul PG
Radian ambi charging handle and safeties
Forward Controls Design:
-Low Drag Forward Assist
-Enhanced Magazine Release
-Augmented Bolt Catch/Release
B5 trigger guard
Silencerco ASR flash hider
BCM QD mount receiver end plate

08642FEC-B7D8-4F45-8C1E-D2D8002CFA92.jpeg
1C654096-8486-4DD2-9900-BB98DB639A5B.jpeg
 
Still have machine work to do on the DRD Tactical rail. In addition to the below mods, the front of the rail needs to be faced off and radiused smooth.

This is a pic of the rail, muzzle down. From the silver mark towards the bottom of the picture, all the way up, I will be machining all that Picatinny rail off.
CF4D8B78-902D-48D2-8AE2-DA98D95906B0.jpeg

This pic is the 6 o’clock of the rail. The recessed areas will be milled completely away (turned into slots), and the raised areas machined off as well.
F887A1BC-A48B-4C3C-8B85-C172056536A4.jpeg

3 o’clock side of the rail, all the recessed areas milled into slots.
BF67402D-1137-488D-BE37-ACD9F816C0EC.jpeg

9 o’clock side of the rail, all the recessed areas milled into slots.
63009FC1-199C-4B66-B009-092758DBA229.jpeg
 
Back
Top Bottom