• ODT Gun Show & Swap Meet - May 4, 2024! - Click here for info

DIY Hydrographic dipping - anyone try it?

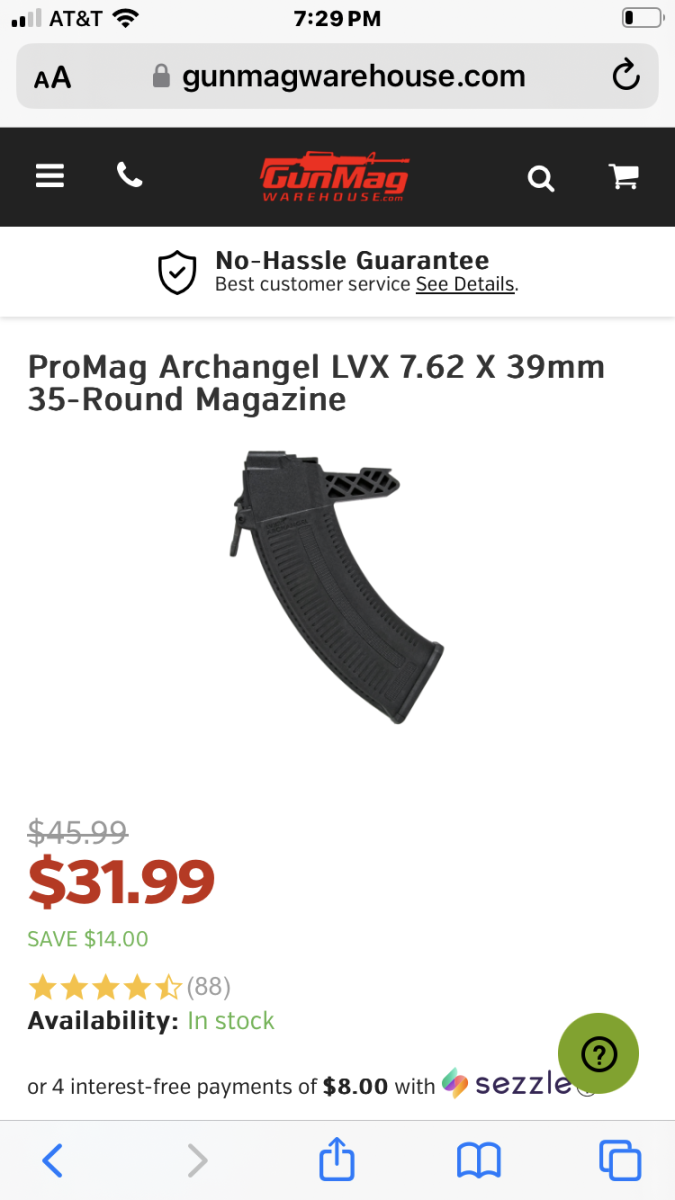
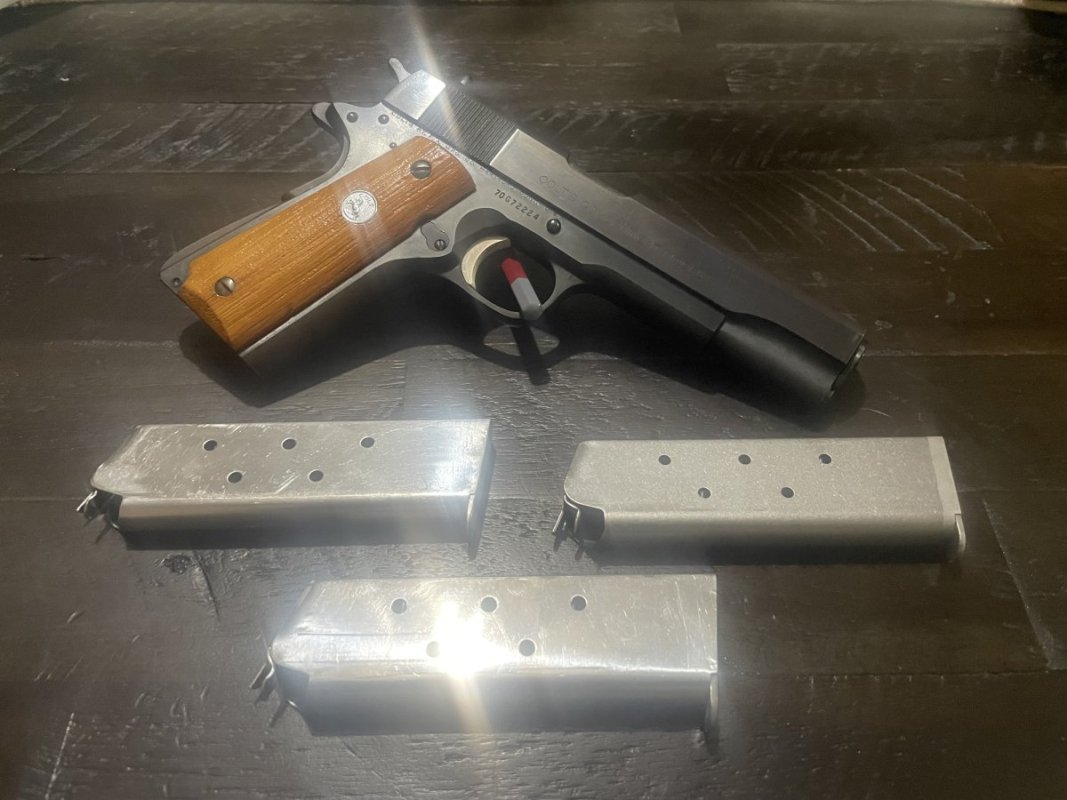
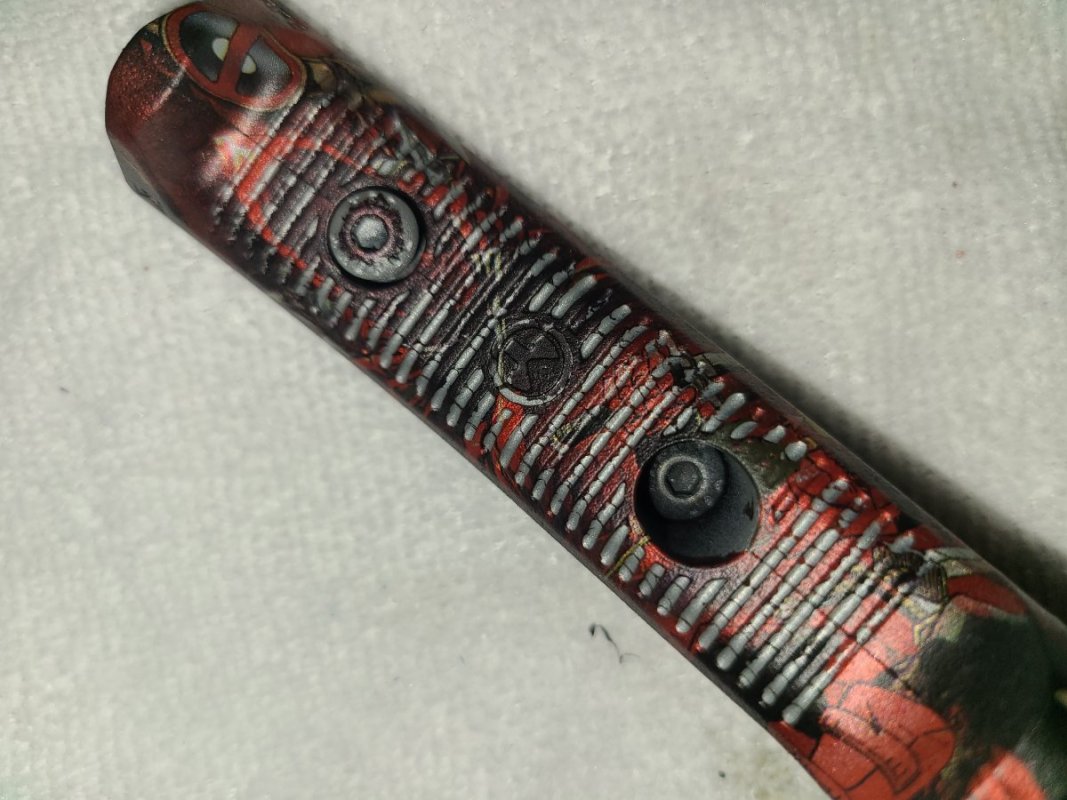
The kydex holster making didn’t spark any desires, but the laser engraver sure did. Tell me, what do I need to get?

Any diode, CO2, or fiber laser will work for engraving the kydex and softer materials...but with any of them, you will need good ventilation to pull the fumes and smoke out of the room. Kydex gives off Clorine gas when it cut or engraved, so you have to be real careful when doing that. Decent diode and CO2 laser engravers will start out at around $500.

The fiber laser is what you need for metal engraving...but of course, it's not cheap and starts out at around $3500.
 
no, I dipped it half and half. I have had mixed results with the rolling. The other side. It also lost some of the details when clear coated.

Ok...that's best. I would have dipped it half and half too.

I'm not seeing much wrong with the other side, except for the void in the rail recess...which was definitely trapped air there.
 
Ok...that's best. I would have dipped it half and half too.

I'm not seeing much wrong with the other side, except for the void in the rail recess...which was definitely trapped air there.
I was thinking maybe not enough activator, that it was still too film like versus more liquid?
 
I was thinking maybe not enough activator, that it was still too film like versus more liquid?

Yep, if the film is not activated enough then it will not be pliable enought to get down in the recesses...so I think you're on the right track to troubleshooting the issue. Small round pin holes is usually a sign of underactivation and/or trapped air...and jagged holes is usually a sign of over activation. Unfortunately, you probably won't be able to solve those problems while using the aerosol activator because you can't get a consistant spray...and it's really hard when your spray pattern is narrow like you have on an aerosol can, and you have to go back and forth multiple times to get the whole thing activated, because you'll always end up overlapping too much or missing a little strip, etc.
 
Yes, that's what it looks like to me. Any air trapped in the recesses will prevent the film from sticking, and then it will break/peel/flake off. Some things are really hard to do without trapping air, and sometimes you'll have to work around that area or do a "touch up" job on it with a really small paint brush...preferrably before the clear coat, but it can be done after the clear if you have to.

Just curious...did you roll that? It doesn't look like you dipped it half and half.

I think I'm late to the game here. If the base coat is still intact and looks solid, I would agree that it was under activated. On heavy textured surface a good activation and a good entry angle will help. Also your film is important too....some of the batch or custom films are digitally printed to order. Those have lower ink loads than gravure printed films. The heavier ink loads make a huge difference on textured surfaces.
 
Yep, if the film is not activated enough then it will not be pliable enought to get down in the recesses...so I think you're on the right track to troubleshooting the issue. Small round pin holes is usually a sign of underactivation and/or trapped air...and jagged holes is usually a sign of over activation. Unfortunately, you probably won't be able to solve those problems while using the aerosol activator because you can't get a consistant spray...and it's really hard when your spray pattern is narrow like you have on an aerosol can, and you have to go back and forth multiple times to get the whole thing activated, because you'll always end up overlapping too much or missing a little strip, etc.
ordering a spray gun and some Super Brew.
 
I think I'm late to the game here. If the base coat is still intact and looks solid, I would agree that it was under activated. On heavy textured surface a good activation and a good entry angle will help. Also your film is important too....some of the batch or custom films are digitally printed to order. Those have lower ink loads than gravure printed films. The heavier ink loads make a huge difference on textured surfaces.
base coat is intact. The same thing happened on the AFG, prior to the clear coat, the pattern was intact and looked great. After, the pattern is missing on the grooves and the silver base coat shows through.
 

Attachments

  • F2018F86-7B13-4954-8F0E-64E902B9A5D3.jpeg
    F2018F86-7B13-4954-8F0E-64E902B9A5D3.jpeg
    171.7 KB · Views: 9
If you do it right, it will have the same durability as the finish on your car, since it should be clear coated with automotive 2-part clear.

Here's a video that shows a comparison of hydrodip vs. cerakote on a pistol.


If you're planning on dragging your weapon across the concrete or gouging it with a flat head screwdriver, then no, it's not going to hold up...but cerakote won't hold up to those kind of conditions either. So from my experience, if applied correctly, hydrographics should hold up about as well as cerakote. Alot of people may disagree, but like I said...if applied correctly. :)

I agree, if applied correctly it can be as tough as cerakote (base coat, hydrodip, clear coat). Really the main advantage of cerakote is that it's much thinner in a single application.

Seems to do better on polymer parts than it does metal. I refinish factory duck guns all the time (Benelli, Beretta, stogers) that the factory hydro dip looks new on the stocks but the receivers and barrel are peeling and beat to hell.
 
I think I'm late to the game here. If the base coat is still intact and looks solid, I would agree that it was under activated. On heavy textured surface a good activation and a good entry angle will help. Also your film is important too....some of the batch or custom films are digitally printed to order. Those have lower ink loads than gravure printed films. The heavier ink loads make a huge difference on textured surfaces.

Yeah, those custom printed films can be pretty tricky...it took me a little testing to figure them out. But worth the effort when you can have anything you want on the film. :)
 
base coat is intact. The same thing happened on the AFG, prior to the clear coat, the pattern was intact and looked great. After, the pattern is missing on the grooves and the silver base coat shows through.

Yep...that's definitly air trapped in the grooves. Like BillyBob said, angle of attack would be the only way to keep that from happening. You'd probably have to roll that in on it's side to get the paint into the grooves. It's tricky sometimes, and you'll have to look at the part and identify everywhere that air would get trapped, then plan the best angle to get it in there with the least amount of issues.

I still have trouble sometimes with things like that too...and sometimes you can just touch up areas like that before you clearcoat...and if you're unhappy with a hit, don't clearcoat it, just use a little lacquer thinner and it'll come right off so you can do it again. After you clear, it's done...or a pain to strip it back down. LoL

In that situation, I would probably just spray a little black krylon in the cap of the can, and use a really small brush to dab it into the grooves carefully to fill in the black areas. You can actually use a little activator with a small brush, and scrap piece of film to get the paint off the film to use the colors in the pattern.

I'll tell ya something else that I've done in that exact situation as well...take the point of an exacto knife and poke it in spots like those grooves, to see if the paint is standing off the surface a bit with air trapped underneath. If it is, use that exacto knife to poke around a bit to let the air out and let the paint lay down in the groove. Then there will probably be much less touch-up to do, and when you clear over it, it will be solid.

One more thing to keep in mind is that you have to make sure that every bit of the slime is rinsed off before spraying the clear coat...and sometimes you may think it's all off, but if there's any glossy parts after it's been rinsed and dried, then it needs to be rinsed some more, until everything is flat...with no sheen at all.

Keep on dippin' man!

JuJu
 
Back
Top Bottom