• ODT Gun Show & Swap Meet - May 4, 2024! - Click here for info

The Packhorse

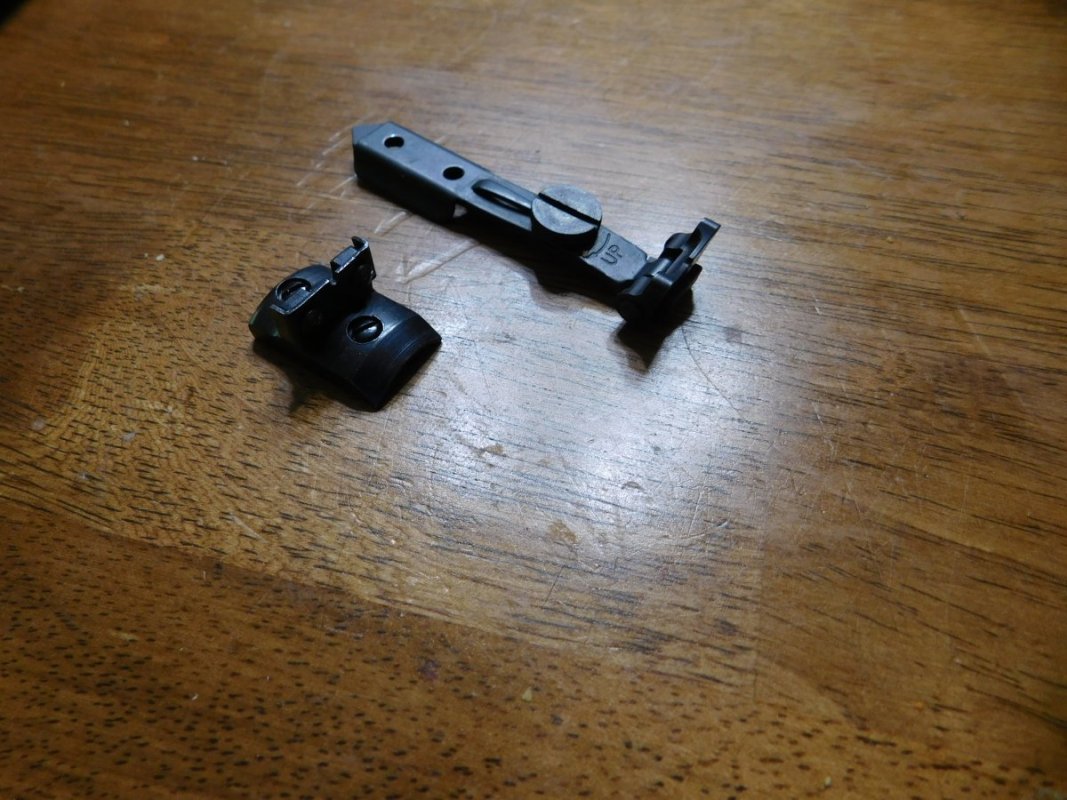
A Bisley grip frame has a long slot for the long nosed Bisley trigger. We are using the 3 screw conversion parts....shorter nose on the trigger and about 3/10" of space in the grip frame to fill up.

i.imgur.com_htP5keh.jpg


A filler block of cold rolled steel is filed into size and soft soldered in place. The ends that protrude above and below the grip frame are then ground and filed back to flush. X marks the top of the new filler block here on the inside top of the grip frame.

i.imgur.com_KK6ixrq.jpg


Here in the trigger guard, the balance of the protruding length is filed and ground down flush. The blue area is filler block. It and the inside of the guard bow will be polished up later.

i.imgur.com_vGbRqY9.jpg


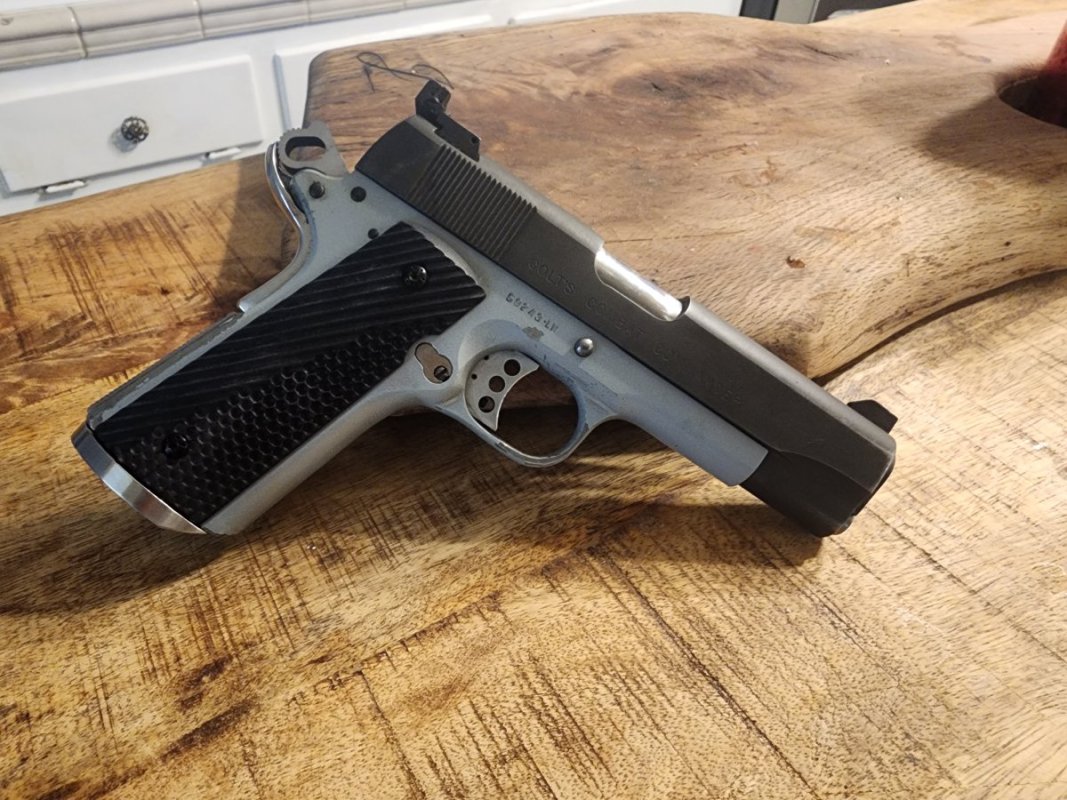
And the rough install, most of the offending gap is now closed. Final fit will be complete assembly and checking for interference. If any, it'll be at the nose of the filler block and that can be carefully relieved with a small safe sided file.

i.imgur.com_yCED5go.jpg
 
Took a break to mow and eat and watch Space Chix on Star Trek.....then put this dude together to see if there was any further tweaking to do on the bottom end. Looks like its all good and I can move to final fitting and finishing of the lower end parts. They'll get rust blued for sure.

Hammer back, trigger finds no interference.

i.imgur.com_al7qCNE.jpg


Hammer forward, same same and the bit of room in front of the trigger is enough to get the frame on and off the grip without a fight.

i.imgur.com_ECxLEBU.jpg


And with everything clean and dry, a crisp clean breaking 3.5lb trigger pull with just a touch of take up.....

i.imgur.com_lZauEe6.jpg


Not much mileage on this gun at all. All the conversion parts are just about 100% original blue......I'd say short of some late term butchery, this one kinda laid around the house waiting to start its shooting life.
 
Almost done modifying the steel ejector rod housing. In this case, a relief cut to add a bit of stroke and to cam the ejector button out of the way.....allowing removal of the cylinder and cylinder pin with out ever having to dismount the ejector rod housing from the barrel.

i.imgur.com_M5sbWBe.jpg


Easy to do with the winged cylinder pin....the spring on the ejector rod button can help "pull" the pin. For reassembly, drop in the cylinder, slightly depress the button and cam it out of the way, cylinder pin drops right into place.

i.imgur.com_8Yhac4Z.jpg


The modification is cosmetically low impact/does not show.

i.imgur.com_TIPDeDU.jpg


On this side, once the parts are bronzed (old European word, means blued or browned) the mod will be less noticeable on this side.

i.imgur.com_FdLCar1.jpg
 
Final fitting of the grip frame to the receiver.....ears, trigger guard and inside the trigger guard bow. Pretty much, careful draw filing, power sanding and some final sanding by hand. Working with parts from different eras and models and its about as close as it can get, Approaching 95% on the grip now. Time to order the front sight assembly.

i.imgur.com_rDtcL7w.jpg


i.imgur.com_yqAEVVA.jpg


i.imgur.com_hzfDuiP.jpg


Tedious work but nothing pissed me off today cause Sunday evening I got to sleep in camp with a baby fawn.
 
Assembling the roughly treated (filing and polishing will follow) shows the patrige blade in the low position, .6" above the surface of the barrel.

i.imgur.com_sXfAhV1.jpg


Unlocking the right side screw, the blade (or beads or whatever ya wind up selecting) can be elevated just over 60 thousands more.

i.imgur.com_qmmv8uX.jpg


A slight backcut will need to be filed into the ejector rod housing so it can overlap the barrel band without a gap. Oh yeah, I spotted and drilled a hole in the barrel band for the ejector rod retaining stud and nut. If the slit in the underside of the ejector rod housing is closely fitted, the band should prevent housing movement and lessen the chance of a sheared screw later on.

i.imgur.com_bKvlrzi.jpg


i.imgur.com_jL4mUkC.jpg


i.imgur.com_at3pvc6.jpg


i.imgur.com_S4YIVeM.jpg


Todays helper is MuddyGirl27 and you may not ever get to shoot this 44 Magnum cause I think she likes it more.

i.imgur.com_N10veVf.jpg
 
Tedious work, undercutting the ejector rod housing just about 40 thousands or so to fit over the barrel band. Curved underside of the ERH and it Flares to the Muzzle end....so, none of the lines are straight and parallel in the directions ya think when its off the gun. Dremel, sanding drum, drill bits wrapped with sandpaper, small hand files, fit and try fit and try. Here about 1 hours work and the rough fit. The last few thousands will take an hour or three more.

The undercut on the front third or so of the ERH......not much but lots of work to get this far.

i.imgur.com_lKQrpkz.jpg


I switch back and fourth working the upper line and the lower line. Here I see, I need to work again on the lower line to fit the upper more closely.....hard to do by hand but satisfying when it finally gets done.

i.imgur.com_ryddBt6.jpg


From above, I again see, I need to remove metal from the lower line to pull the ERH in tighter up top....perhaps a few thousands gap now but I'd like to close it a bit more if I can.

i.imgur.com_rnJLn1a.jpg


From below, a bit tighter fit and a straighter line....the flare to the front end of the ERH is less pronounced on this side......it sure is hard to get it right up top though.

i.imgur.com_HlYVnpI.jpg
 
Not yet but its coming along. Had to stop....arthritis makes the fingers tired and sloppy faster.....everything takes longer these days but I ain't buyin no mill or lathe!
 
The banded ramp front sight is for a rifle. Its from NEGC. As such, it comes grooved for a hood. Don't need a hood on a hangun. But, I do need a sold brass door hinge to make it right.

So.

The hinge, solid brass.

i.imgur.com_KguLHGZ.jpg


The hinge thinned and trimmed and the hood grooves deepened and widened......some flux, some solder, a clamp and heat.......and a bit of filing and initial sanding and a touch of cold blue to give the impression of how it'll look when completed.

i.imgur.com_WJhEFxE.jpg


i.imgur.com_SKEgPOw.jpg


i.imgur.com_pccUAWD.jpg


i.imgur.com_v9QGpha.jpg
 
Front sight: .974 low setting +.060 at high setting over bore centerline.

Rear sight: .806 low setting to approximately .936 (short old model sight screw and low rear blade) at high setting over bore centerline.

Therefore, midpoint of the rear sight with the short OM screw and low OM leaf is .871 above bore centerline.

Plenty good. Front sight is 1/10 higher than the rear at its midpoint.

Change to the longer Hunter model rear sight screw is indicated for a greater range of adjustment (i.e. taller rear sight). As needed, the hunter rear leaf is another .040 taller yet.

I predict that even if a kiss of metal of the top of the front sight is required, 240g full house loads are going to be relatively inexpensive and quick to zero at about any practical range from Get Off Me to 50 yards.
 
Back
Top Bottom